


What is Keplr? How to use Keplr wallet for the first time
Looking for a secure way to hold your assets? We will show you how to install Keplr and how to create a wallet from scratch, so you can use Keplr to interact with the Cosmos ecosystem. You will be able to stake your assets and manage them securely, knowing that they are always in your custody.
What is Keplr Wallet?
Keplr is an non-custodial digital and IBC-enabled wallet driven by the community. It is available as a mobile app, web app, and browser extension.
As a result of its wide adoption within the Cosmos ecosystem, it will be a handy tool for safeguarding your tokens. A wide range of dApps and blockchains will also be available in the ecosystem for you to interact with as part of your experience.
The Keplr Wallet differs from CEXs in that you keep your tokens in your own pocket, as opposed to CEXs where they are actually held by third parties. Thus, Keplr somehow eliminates many of the risks associated with centralization. Want to jump into decentralization? We will guide you through the process!
Create and manage your Keplr Wallet account
We will begin by installing the Keplr Wallet browser extension. It is available for iOS and Android devices in a mobile version, as well as a desktop version. With the Keplr browser extension, you will be able to interact with other decentralized applications in the ecosystem, as well as send and receive tokens in a matter of seconds.
1. How to install Keplr
If you want to install Keplr in Chrome, Brave or Firefox, search for it in the Chrome Web Store and add the Keplr extension to your browser. Keplr is officially designed for Chrome, but it is also compatible with Brave.
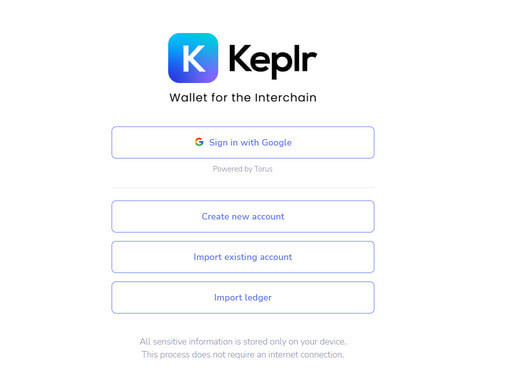
As soon as you open the extension, you will see a variety of options: you can create a new account from scratch, or import your existing account from your seed phrase if you already have one. In addition, Keplr provides the option of importing accounts from Ledger, the most secure option, but requires specific hardware.
2. How to create a new Keplr account
To create your Keplr wallet, click Create new account.
Your seed phrase or mnemonic phrase will be 12 words that will be used to import your account whenever you need it. Keep these 12 words in a safe place. Do not share it with anyone, as anyone who has your seed phrase will have access to your funds. Copy it, put it in a safe place, and keep it safe.
Set a secure password for your wallet and give it a name.
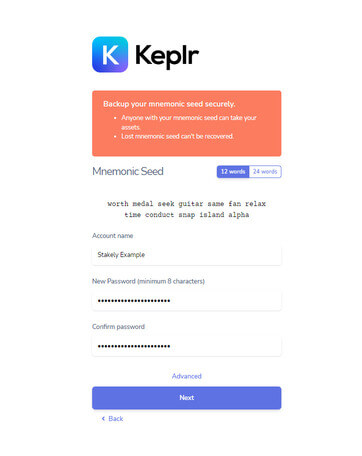
- Finally, confirm that you have copied the words correctly by entering them in the correct order and clicking Register. Congratulations! You have just created your Keplr wallet!
Connecting your Keplr wallet to a website gives the website permission to access certain information, so be careful and only connect your Keplr wallet to secure sites.
However, you can always delete the connections you have made with your wallet from the Manage Connections section of your wallet settings.
3. Import an existing Keplr wallet
In order to import an existing wallet into Keplr, you will need to use the second option when you open the Keplr Wallet extension: Import Existing Account.
After entering your wallet mnemonic phrase, click Advanced to ensure you import your Keplr wallet with the same "Derivation Path" to prevent it from generating a different address from the wallet you are trying to import.
Finally, click Confirm after choosing a strong password for your newly imported Keplr wallet.
Learn how to send and deposit tokens using Keplr
Make your first deposit into your Keplr wallet to interact with the Cosmos ecosystem!
If you want to deposit your tokens in Keplr, you will need to get the address of your wallet so that you can indicate it as the destination wallet on the platform where you are sending them from. Open the Kelpr browser extension, choose the network where you want the tokens to be sent, and then click Deposit to access the QR code, or click under the wallet name to obtain the full wallet address.

Alternatively, you can send tokens using Keplr by selecting Send. Below, we explain what each of the fields entails:
-
Recipient: the address of the destination wallet to which you send the tokens.
-
Token: choose the token you want to send.
-
Amount: how many tokens you want to send.
-
Balance: your total available balance.
-
Memo (optional): only fill in if you are sending funds to a CEX.
-
Fee: the commission for the transaction. Depending on the urgency of the transaction, you can choose between a low, normal, or high fee.
Once you have filled in these fields, click on the Send option and approve the transaction in Keplr!
In order to make IBC transfers, you can follow our IBC guide on our blog, or watch our video tutorial.
Stake using Keplr Wallet to earn staking rewards
Next, we will explain how to stake with Keplr. The example we will use is the Evmos network to illustrate the process step-by-step.
-
Start by opening the Keplr extension and selecting the network you want to stake, in this case the Evmos network. Click on Stake.
-
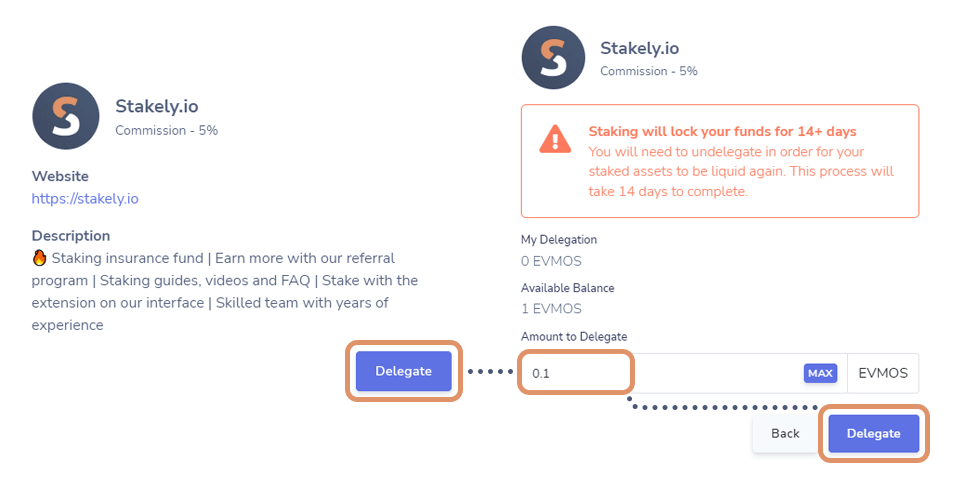
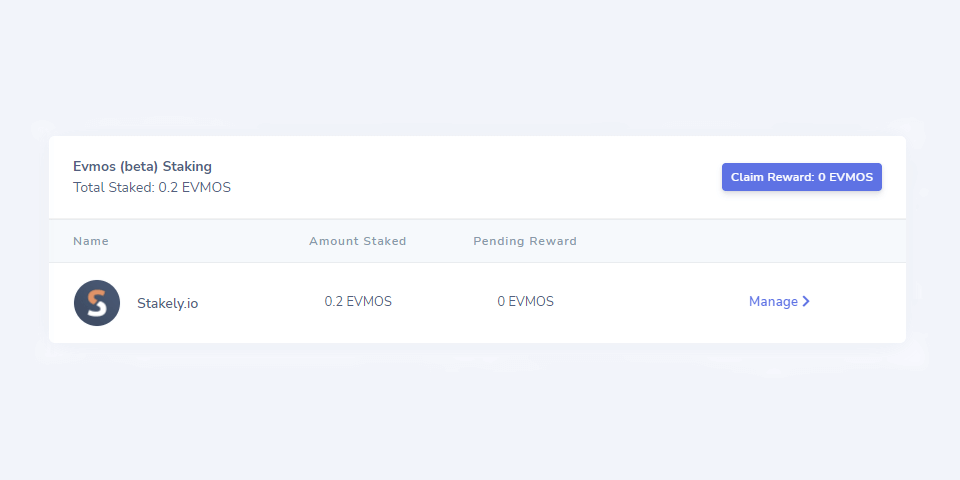
You will be redirected to the Keplr web app automatically, where you can view a list of validators you can delegate to. The key is always to choose a validator who does not have too much voting power to decentralize the network, has no abusive commissions, and is actively involved in the project's governance.
Stakely meets the requirements listed above, so we will make sure you get the most reliable service if you decide to stake EVMOS with us. With our experience validating 40 Proof-of-Stake networks, we continue to contribute cutting-edge tools and quality content to the community.
- Once you have located Stakely in the list of validators, click Manage. Next, click Delegate. Now enter the number of tokens you would like to delegate. Note that when you stake, those tokens will be locked and can only be unlocked by passing the unbonding period set by each protocol.
- As a final step, you need to approve the transaction on Keplr. That's it!
How to claim your staking rewards?
Click on the blue Stake button on your Keplr extension to return to the Keplr Dashboard to claim your staking rewards.
In order to claim your rewards, click the Claim button to receive them directly into your wallet.
In addition, we offer support for REStake, which enables you to compound your staking rewards automatically.
How to undelegate?
Now that you have staked EVMOS, you will see a list called My Validators, where you can view the validators you are currently delegating your tokens to.
If you want to undelegate and stop earning passive rewards, hit the Manage button and then select Undelegate. Now, approve the transaction on Keplr.
You will need to wait the unbonding period established by the protocol before you can use your tokens again (often 7, 14, 21 or 28 days). In the case of EVMOS, the unbonding period is 14 days.
How to redelegate to another validator?
In case your validator has been jailed or is inactive and you have stopped earning rewards, or in case you simply want to change validator for other reasons, you can do so without having to go through the unbonding period you go through when unstaking.
Find the validator from which you want to redelegate your tokens and click on Manage. Now you will have to click on Redelegate and specify both the amount you want to redelegate and the new validator you have chosen. Done!
Normally, after a redelegation has been completed, you must wait for a period of time before you can repeat the process (normally this period is the same as the bonding period).
Now you're all set!
You master Keplr like a pro! Keplr has a lot of advantages within the Cosmos ecosystem. Therefore, having a Keplr wallet will allow you to interact with the majority of protocols and dApps in the ecosystem. We hope this guide has helped you to safely embark on the world of decentralization.
Welcome to the Interchain community! 🚀


